
General info – Group portal
What is a group portal?
The group portal is a portal where it is possible to manage several single, local portals in a group. In the group portal, you get admin rights over all the local portals added to the group. This allows you to control and create things in the group portal, and choose the local portals this should relate to, instead of sitting in each portal and creating the things to create. You can also access the local portal directly from the group in several cases, such as when you need to correct a workflow description in a local portal. This is possible to do from the group portal, so you do not have to go into the individual local portal, even if it is only something about the individual local portal that needs to be corrected.
How to navigate in the group portal
When opening the portal, the first page will always be the Dashboard. The starting page looks like this:
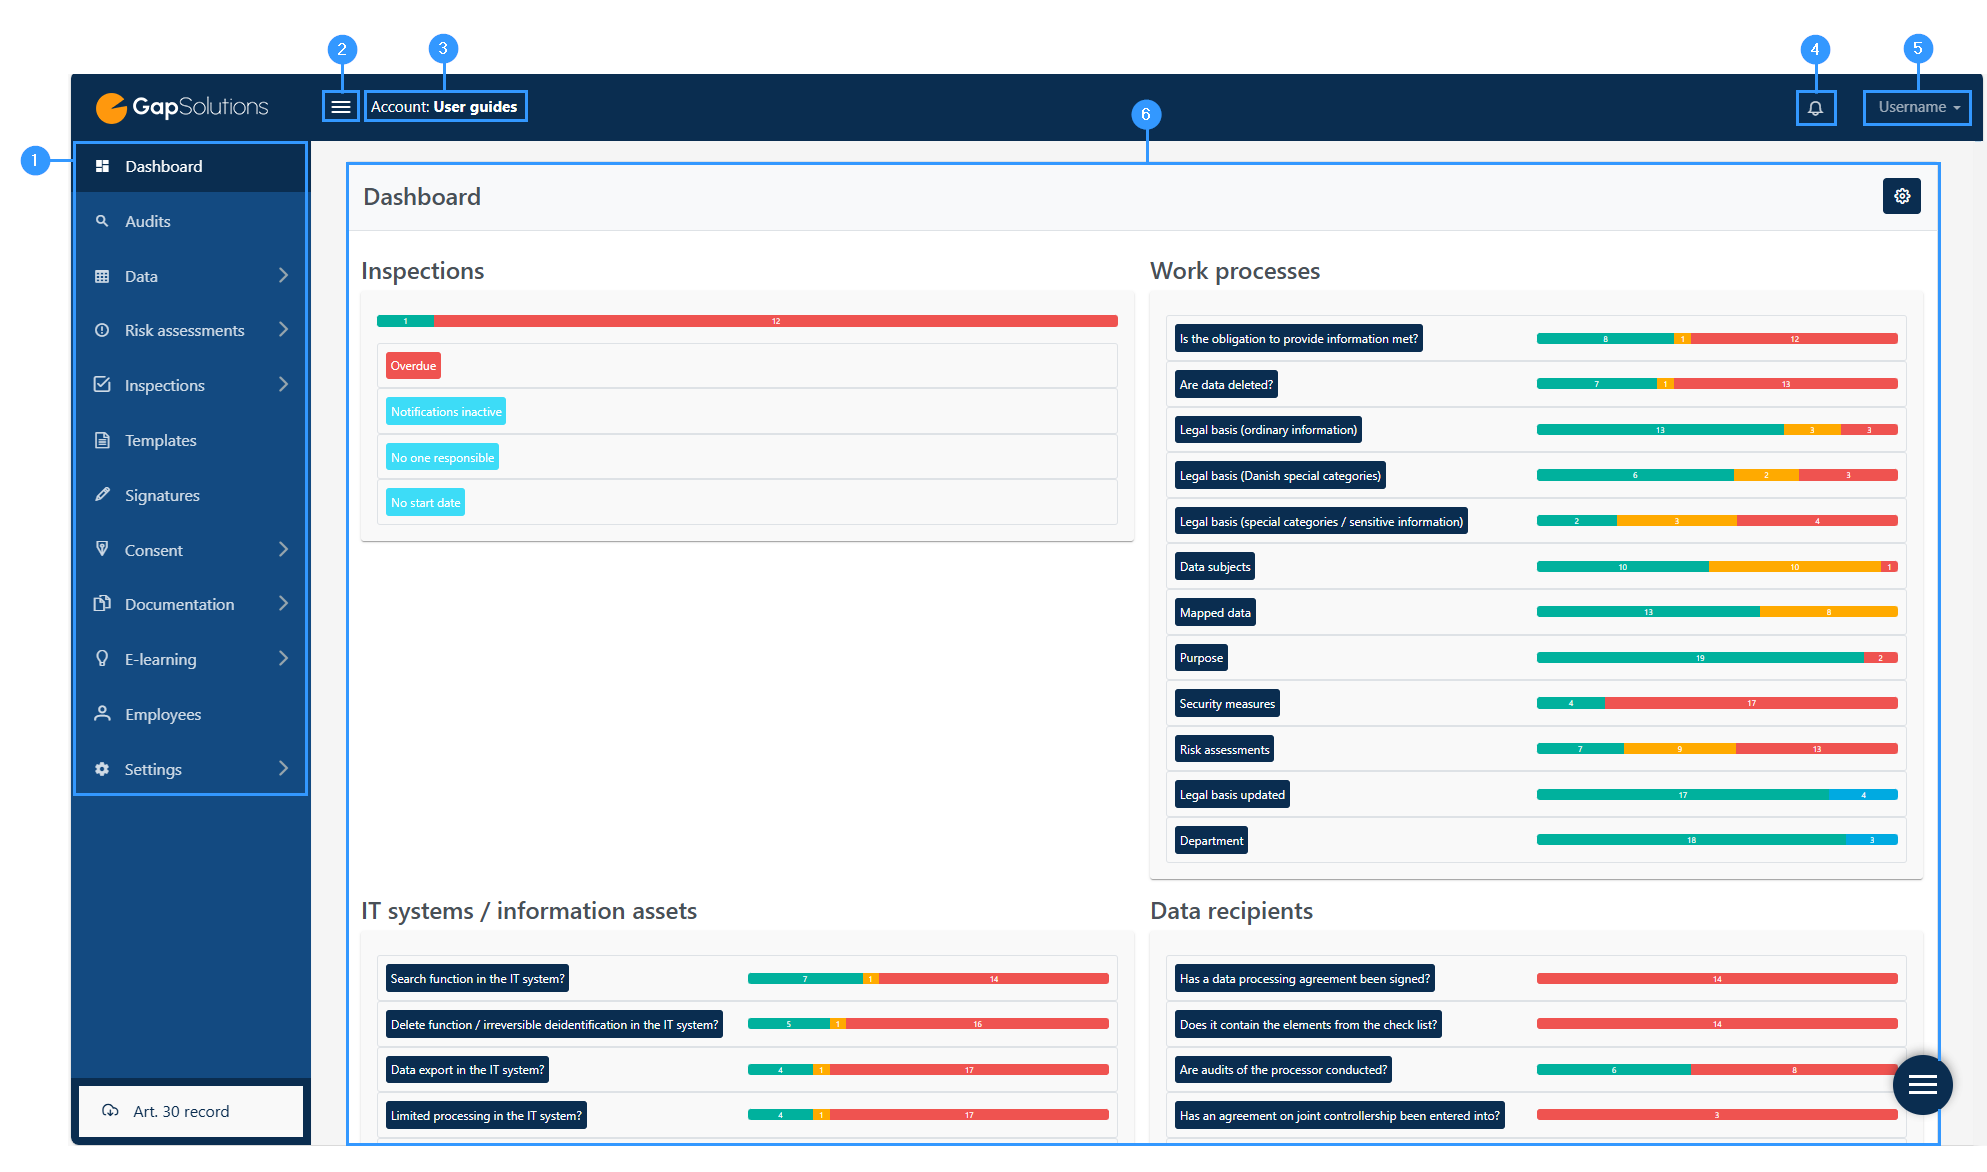
- Menu bar: Here you can access the different menu items in the portal. Read more about the different menu items below.
- Open / close the menu bar: When clicking on this icon you can open and close the menu bar.
- Account: Here you can see the account you are using.
- Notifications: By clicking on this icon, a small bar will open with an overview of the notifications. It could be notifications regarding inspections, approvals or reading requests. In the bar you can open a window with all the notifications by clicking on “View all notifications”.
- Inbox: Here you will be able to see when new messages is sent out from the menu item ‘messages’. The functions within this feature will be reviewed with the menu item ‘messages’.
- Profile: Here you will be able to see which profile, you’re logged in to in the portal. By clicking on the username or the little arrow next to the username you will open a bar. In the bar you can choose the following: Profile, change account or logout.
- Dashboard: This is an overview, where you will be able to see different elements from the portal such as inspections and their status. Read more about the menu item here. When working in a group portal the dashboard will update every hour, so if you create new inspections etc., these won’t show instantly in the dashboard.
General introduction to the different menu items
In the menu bar to the left, you will find all the menu items. This is where you navigate through the different features in the portal.

Below, it is possible to click on the titles of the menu elements if they are blue, which will lead you directly to an instruction on how to navigate in the different modules. In some of the describtions to the titles, some words will be blue, and these will lead you directly to an user guide on the topic.
- Dashboard: By clicking on the Dashboard, you will open an overview of inspections among other things, where you’ll be able to create an overview of the different elements.
- Data: By clicking on this item, the bar will open a line of sub-items with Work processes and Data recipients among other things regarding data. You will need this menu item when creating and editing Work processes and other data related elements.
- Risk assessments: By clicking on this item, you can choose between two sub-items: Risks and risk categories.
- Group Inspections: Here you can access Inspection series and annual wheel
- Templates: In this module you will find various help documents, templates and check lists, which can form the basis for the documentation of meeting the requirements in the regulations.
- Files: I denne sektion kan du gemme filer i mapper.
- Messages: Here it willbe possible to create group messages and access an overview of the existing messages.
- E-learning: Here the sub-items that will open are Overview, and E-learning sequence.
- Data breach log: Here you can choose between Local breaches and Data breach log.
- Settings: In this menu item a line of sub-items will open, where you can access the different settings regarding Users, Departments, User Management, Account setting and Mail settings.
Main functions when working in the portal
Convert local

In several places in the group portal, there will be a blue icon that says, “convert local”. This applies, for example, to work processes. As a starting point, this feature is relevant when you have started with a local portal, in which you have created the different parts for the individual company and subsequently need to move to a group portal. To explain the function better, the following will be based on work processes, even though this not only apply to work processes. If a local portal has an already created work process, such as salary, and the local portal later belongs to a group portal where the other portals have not yet created a work process for salary, it can be converted and created for the other portals. It’s important to note that if you simply convert a portal and assign it to the other portals, the content of the work processes must be the same for all assigned companies. If you have several local portals, all of which have a work process for salary, where you do not want them to be the same, or you basically want to first get an overview and be able to compare the work processes, this can be done by linking the processes, which will be reviewed further down.
When you click on the blue ‘convert local’ icon, a window will open where you need to select which local work process, IT system/information asset or data recipient you want to convert. If you click convert local within the work process map, you can choose from local work process that were created locally in a portal and have not yet been converted to the group portal.
After selecting the part, you want to convert you must confirm it in the window that will open. It is important to note that by converting a local element, you bind it to the group element. This allows users in the group portal to correct and delete the item.
In the example below, a work process has been converted from a local portal.
- By the icon on the left, you can access the individual work process and edit it. This feature may be relevant if you have converted a process from a company that you also want to apply to the other local portals. Here it will be possible to assign the process to the other portals. Next to the edit icon, there is a function menu where you can link, unlink, archive, and delete. The link and unlink features will be reviewed below.
- Here you can see how many local portals this workflow is assigned to.
Link / Unlink

The two icons above represent the link and unlink functions. On some pages in the group portal, these functions will not be displayed with the above icons but will appear as ‘link’ and ‘unlink’ in a function menu. The ‘link’ function, which is the blue icon above, is relevant in a variety of situations. To better explain the feature, it is again based on an example of salary work processes, although the functionality also applies to many other parts of the portal than just work processes. First, you may have several local portals that have all created a salary work process locally. In some cases, it may be desirable to leave all work processes as they are, and it will be possible to link them in the portal because they all relate to the same thing but let them keep the information that has been entered into each of them. Another example of using the feature is the ability to compare, for example, work processes from the different local portals to make it easier to see which process is best described, and then adjust the others accordingly.
Here’s an example of a converted work process that links other local portals’ work processes.

- This icon must be turned on to edit the field.
- In this field, you can view and edit the description from the process converted or created in the group portal.
- Here you can choose to turn all local portals on or off, and what happens when you turn them on below is that you customize them, so that they get the same description as the converted process, if they don’t already have it.
- In this field, you can unfold descriptions for each local portal and compare them if they are different. If there are changes that make the content different in the local portals work processes, there will be a small orange box where it says, “local changes”, which draws attention to this.
- Click here if you have made changes to the individual description that you want to save.
Adresse
GapSolutions A/S
Uraniavej 6
DK-8700 Horsens
CVR
CVR-nr. 38582356
Telefon
Salg & administration
(+45) 8844 0808
Helpline & konsulenter
(+45) 2199 0808
E-mail
Kontakt@gapsolutions.dk
Support@gapsolutions.dk
Vi bruger udelukkende tekniske cookies på vores hjemmeside. For yderligere information se vores Cookiepolitik.
Vi er ISO 27001-certificeret og ISAE 3000-auditeret.