
Work Processes
Work processes are also called processing activities in different legal texts.
Personal data is defined as all information that can identify an individual. All work processes need to be mapped, even if it’s only a name that’s included.
How to work with work processes
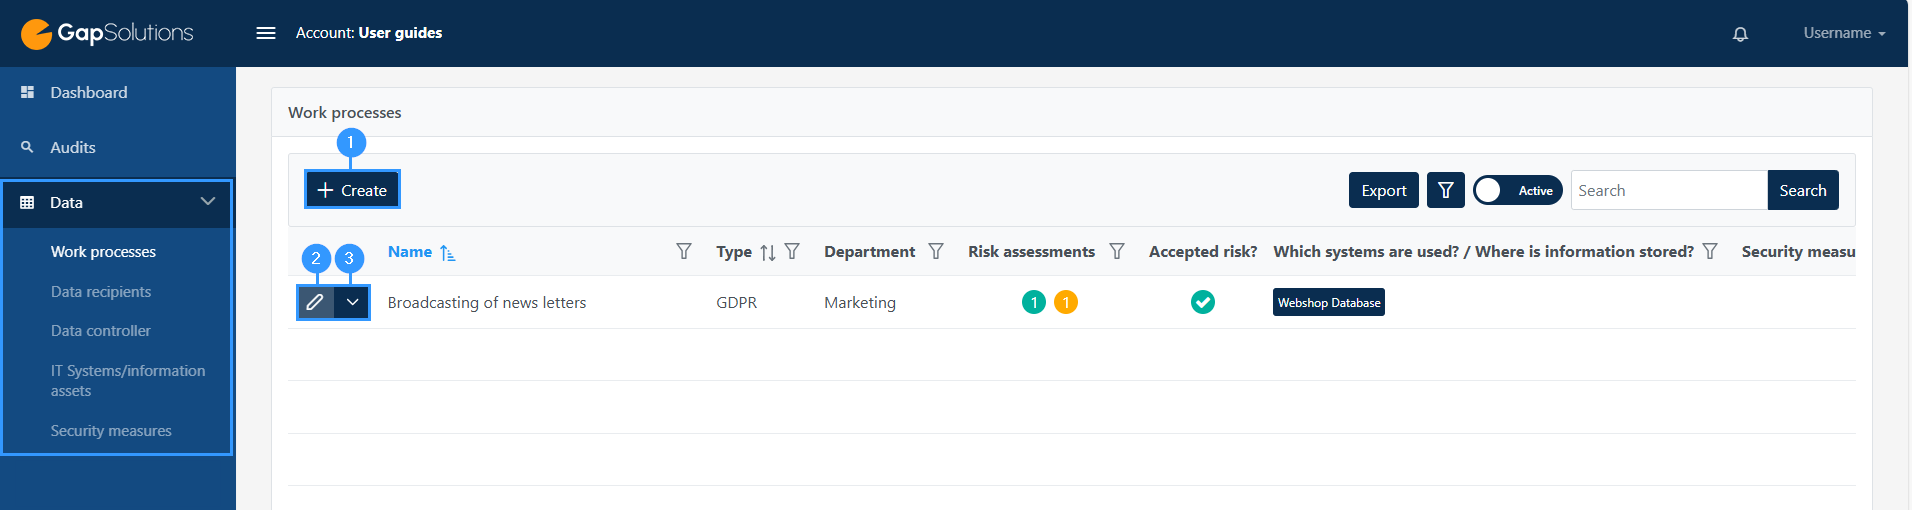
When clicking ‘create’ as shown (1) in the image below, or ‘edit’ (2) you will open a longer form.
When the form is completed, it will contain all the necessary information, which forms the basis of your GDPR-compliance.
If you want to copy, export, archive or delete, press (3) in the image below.
Creating a new work process
When you create a new work process, the following form will open:
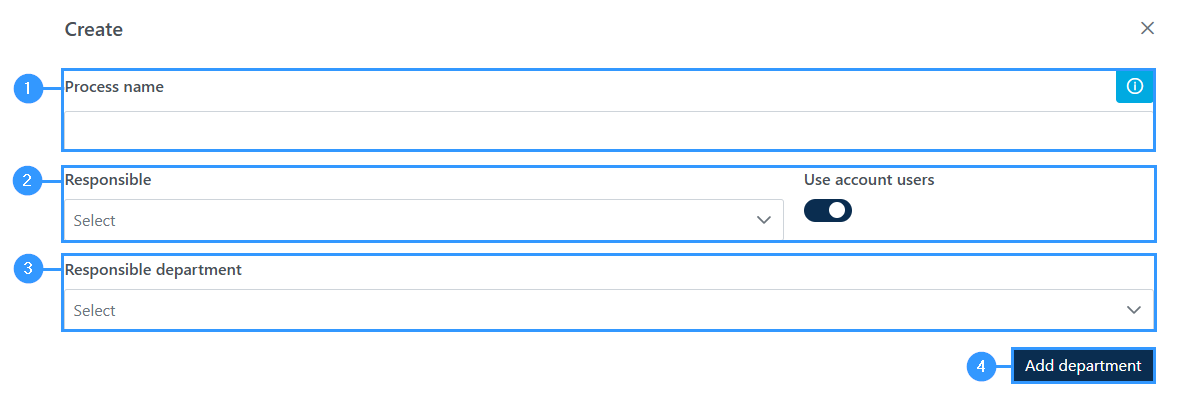
1. Process name
-In this field you must enter the name, you want to know the process by. It’s up to you what the name should be, but it’s important that you choose a name, that makes it manageable for you, to know the process by.
To get some inspiration for names for work processes you can go to the item “templates” in the menu bar to the left on the Dashboard
2. Responsible
-All work processes must have an internal responsible. In this field of responsible you can choose between entering the position of the person, that is responsible or the person by name.
3. Responsible department
-By clicking on the field an overview of departments will show.
4. Add department
-If there’s missing a department, you can add a department by clicking on ‘Add department’ (4) in the image above.
Description of the process and purpose of the data processing
When having a work process, it’s important to know what you do in the process from start to finish and why you process personal data in connection with the work process.
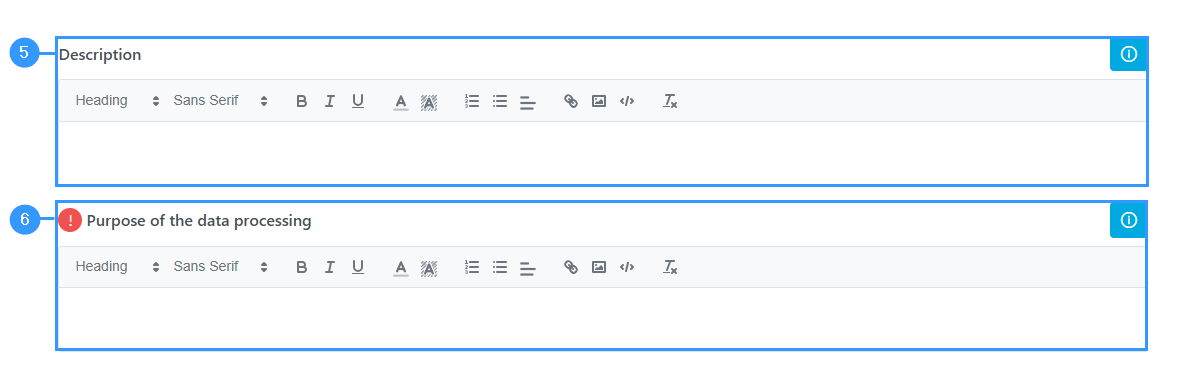
5. Description
-In this field you must describe what you do in the work process.
6. Purpose of the Data Processing
-In this field you must describe why you process personal data in connection with the work process.
Data controller or data processor?
In the form you must enter if you are data controller or data processor in connection with the work process.
The choice of role in connection with the work process will make the form adapt.
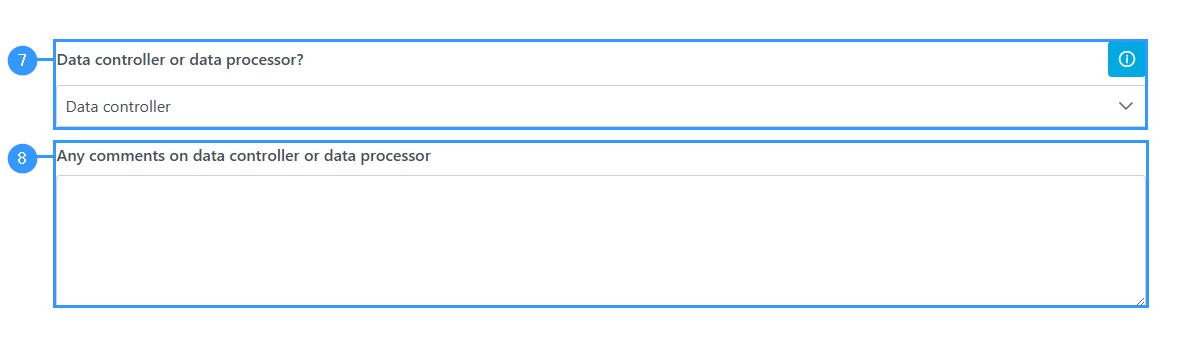
7. If you are data processor
-The later fields regarding legal basis will become inactive, as it’s the data controller that needs to enter this information. When choosing the role ‘data processor’ a new field will show below. In the field you must enter who the data controller is, that you’re processing data for.
You can also choose ‘joint controllers’
8. Joint controllers
-If you choose the type “joint controllers”, it can be relevant to use the field ‘Any comments on data controller or data processor’ to give a further explanation of the joint controlling.
Which systems are used? / Where is information stored?

9. Wich system is used? / Where is information stored?
-In this field you must enter which systems, that are used when processing data and where the data is stored. When clicking on the field, a list will open showing the different systems.
10. Add IT system / information asset
-If a system is missing, you can create and add a new system by pressing here.
Who is data shared with?
In this field you must enter all the data recipients, which receive data in connection to the work process.

11. Who is data shared with?
-When clicking on this field, a list of data recipients will open.
12. Add data recipient
-If a data recipient is missing, you can add it by pressing this botton
Who is the data about?
In this field you must create the data subjects regarding the work process.
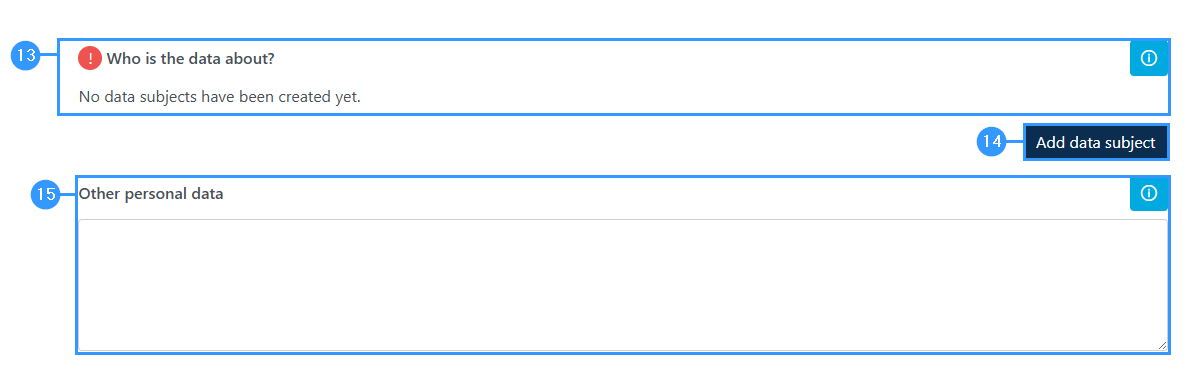
13. Who is data about?
You must add a data subject
14. Add data subject
-If a data subject is missing, you can create and add a new one by pressing this botton
15. Other personal data
-Here, you can enter personal data which are gathered and are not on the list above.
Data Subject
The choices in this form will adapt the rest of the fields of the work process-form and choices regarding legal basis.
When you have filled a form of a data subject, it could look like this:

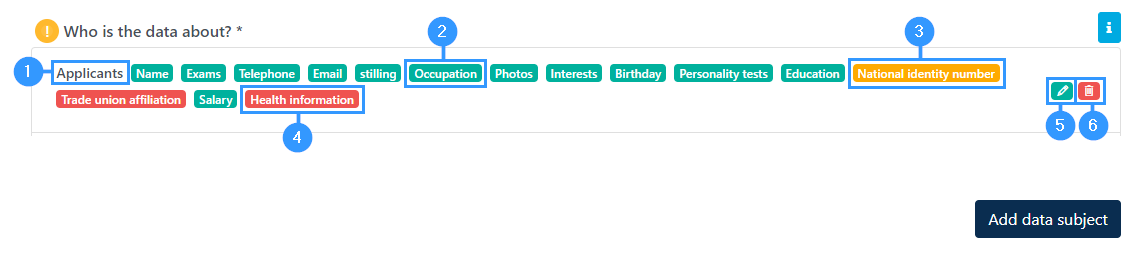
- The type you chose in the form.
- The ordinary information you chose will be green.
- The special information you chose will be yellow.
- The sensitive information you chose will be red.
- Edit the form regarding the data subject.
- Delete the data subject.
Legal basis, data controller
If you are data controller the form will show fields regarding legal basis, after you’ve filled out the parts regarding the different kinds of information. You must fulfill the legal basis of each type of information that is being processed.
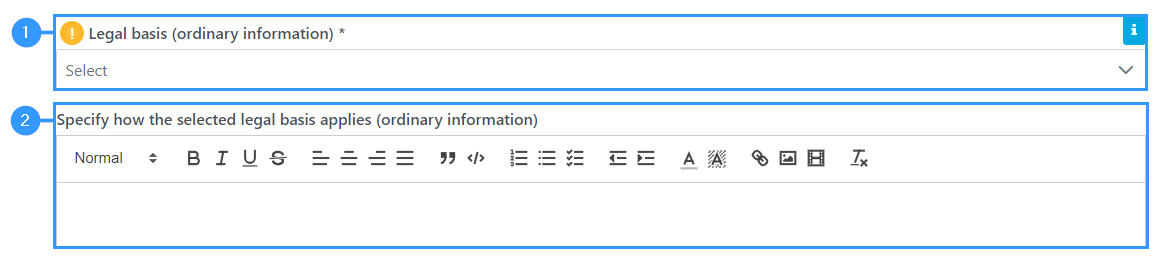
1. Legal basis
-By clicking this field, an exhaustive list of legal bases will show.
2. Specifying how the selected legal basis applies (ordinary information)
-Here you need to justify why and how the selected legal basis applies.
The same procedure follows for each type of information. Please notice that when choosing the legal basis for sensitive information you must choose two legal bases.
Is the obligation to provide information met?
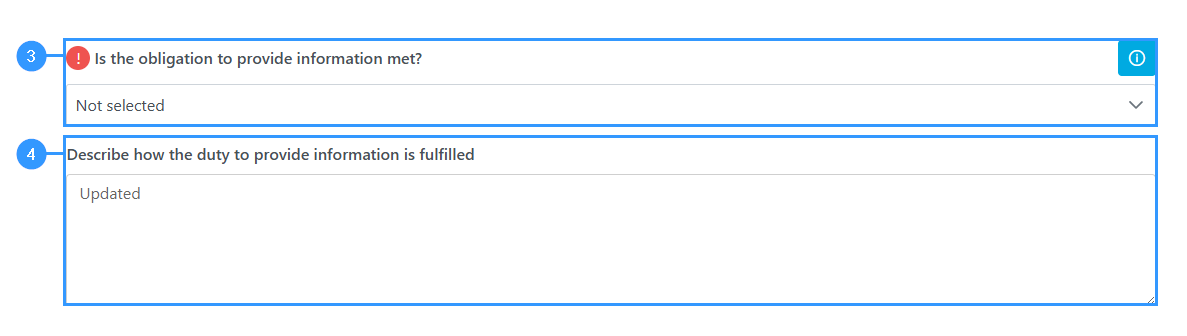
3. Is the obligation to provide information met?
-If you are data controller you must provide an answer to if the obligation to provide information is met.
4. Describe how the duty to provide information is fulfilled
-If you’re not able to submit the answer, “yes”, we recommend that you use the box below to describe why the obligation isn’t met or how it is met partially.
Are personal data transferred to unsafe third countries?
If you in the start of the form specified a data recipient that is placed in an unsafe third country, the data recipient will automatically get registered in this field.

Are data deleted?
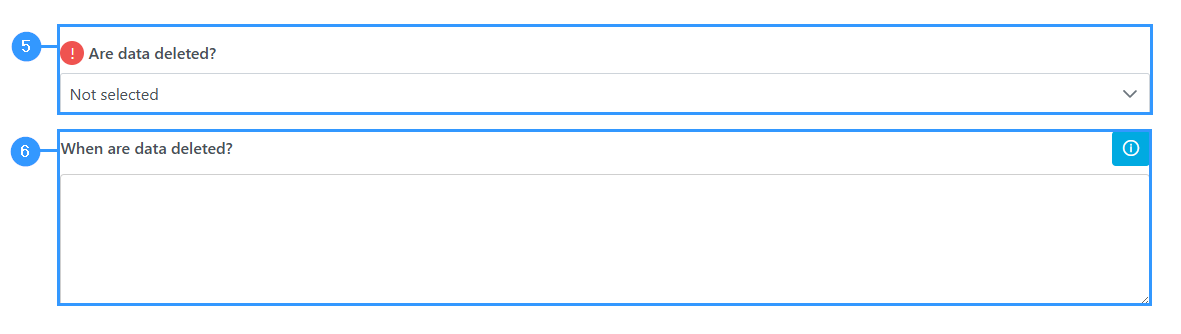
5. Are data deleted?
-In this field you must enter if personal data gets deleted again. By clicking on the field, a bar will show with different options. Generally, all personal data must be deleted when it does not serve a purpose keeping it.
6. When are data deleted?
-In the field under you must enter when data will be deleted. For the sake of thoroughness, we recommend including a description of a deletion routine.
Who has access to data?
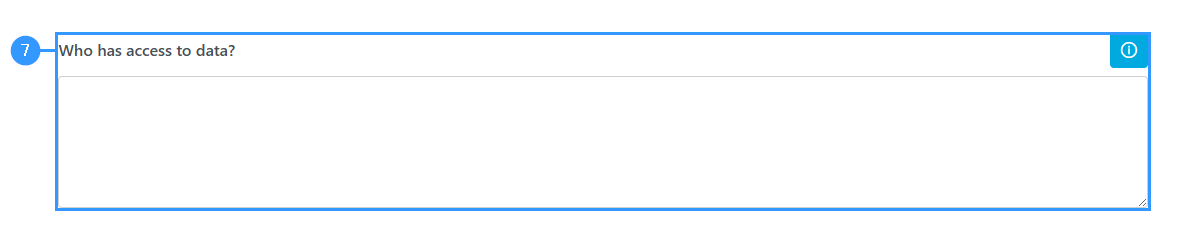
7. Who has access to data?
-Here you must enter the persons in the organization that have access to the data.
Security measures
Every work process must be covered by adequate organizational and technical security measures. This is how you submit which security measures your work process is covered by.


9. Comments regarding security measures
-By clicking on this field a list of security measures will show.
10. Add security measures
-If a security measure is missing from the list, you can add it by clicking here. This will open a form, that you must fulfill as described in the following image below.
11. Are the security measures adequate?
-At the end of entering the security measures you must enter if the security measures are adequate. By clicking on the field, a list of different options will show.
Add security measures
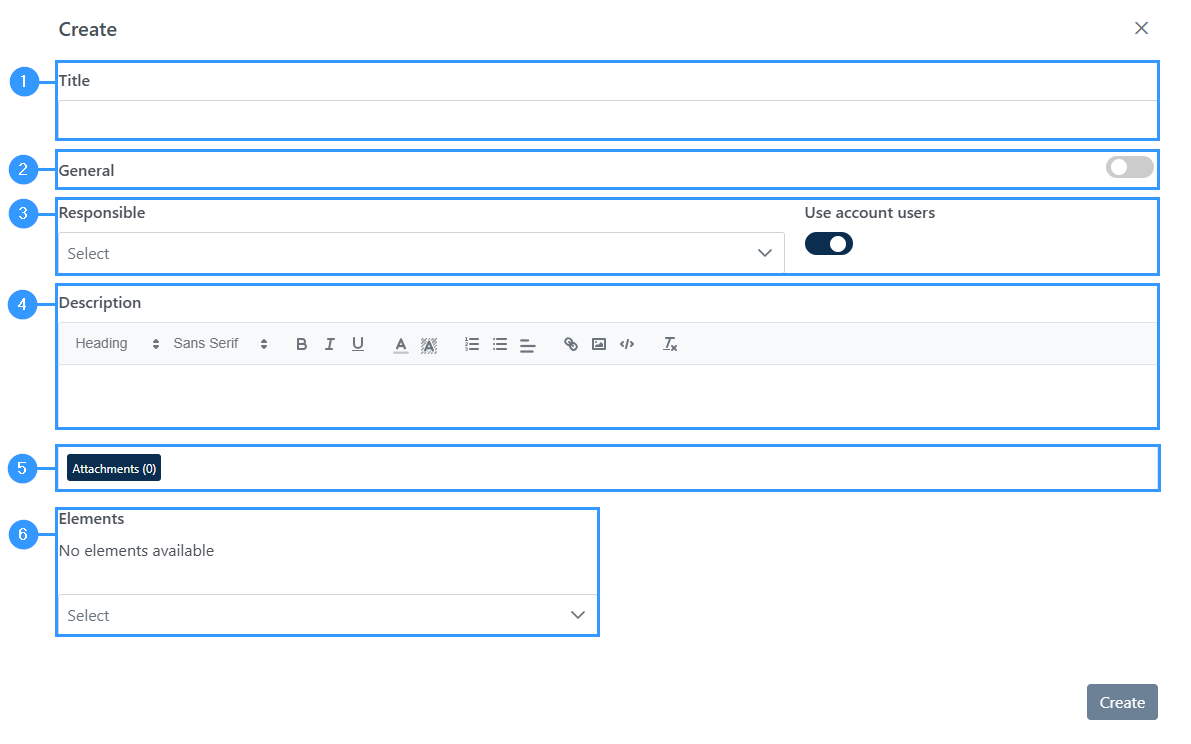
1. Title
-Here you must write the title of the security measure.
2. General
-You can click on the icon to the right if it’s a general security measure.
3. Responsible
-Here you must enter the person responsible for the security measure. You can also choose to click on the icon ‘use account users’, and the field will change to a list over the users. It’s up to you, which option you choose.
4. Description
-Here you must specify the security measure.
5. Attachments:
-In this field you can see attachments.
6. Elements
-At this field you can add elements.
Suggestions for improvement of the work process
In this field you can enter suggestions for how to improve the work process.

Completion of fulfilling the form regarding work process
At the end of the form, you can add files, by either pulling them into the field or by clicking ‘choose files’. When you click on ‘choose files’ a window will open, where you can find all documents.
When you have finished the form, you must click on the button in the right corner at the end of the form. It will say ‘Update’ if it’s a work process already created or ‘Create’ if it’s a new work process.
Support features
At the top right corner of the form there is a line of support features. The support features are given following icons:

1. Send
-Access to send a work process to an employee, so that the employee through the link can edit the work process. This option could be relevant, when an employee only rarely has to edit the work process or if you want to limit what the individual can access of data in the portal.
2. Copy link
-This is a shortcut to the process. When clicking the icon, it will turn green and save a shortcut in your clipboard. You can use this icon to send a deep link to another user of the portal.
3. Log activity
-This icon is a log over all changes in the work process. In the log it’s possible to see which employee that has edited the different field of the form.
Adresse
GapSolutions A/S
Uraniavej 6
DK-8700 Horsens
CVR
CVR-nr. 38582356
Telefon
Salg & administration
(+45) 8844 0808
Helpline & konsulenter
(+45) 2199 0808
E-mail
Kontakt@gapsolutions.dk
Support@gapsolutions.dk
Vi bruger udelukkende tekniske cookies på vores hjemmeside. For yderligere information se vores Cookiepolitik.
Vi er ISO 27001-certificeret og ISAE 3000-auditeret.