
Signatures
This module in the portal allows you to create signature orders for documents to be sent out for digital signature. You can send a signature order directly through the portal or get the link for the signature order and send it out yourself.
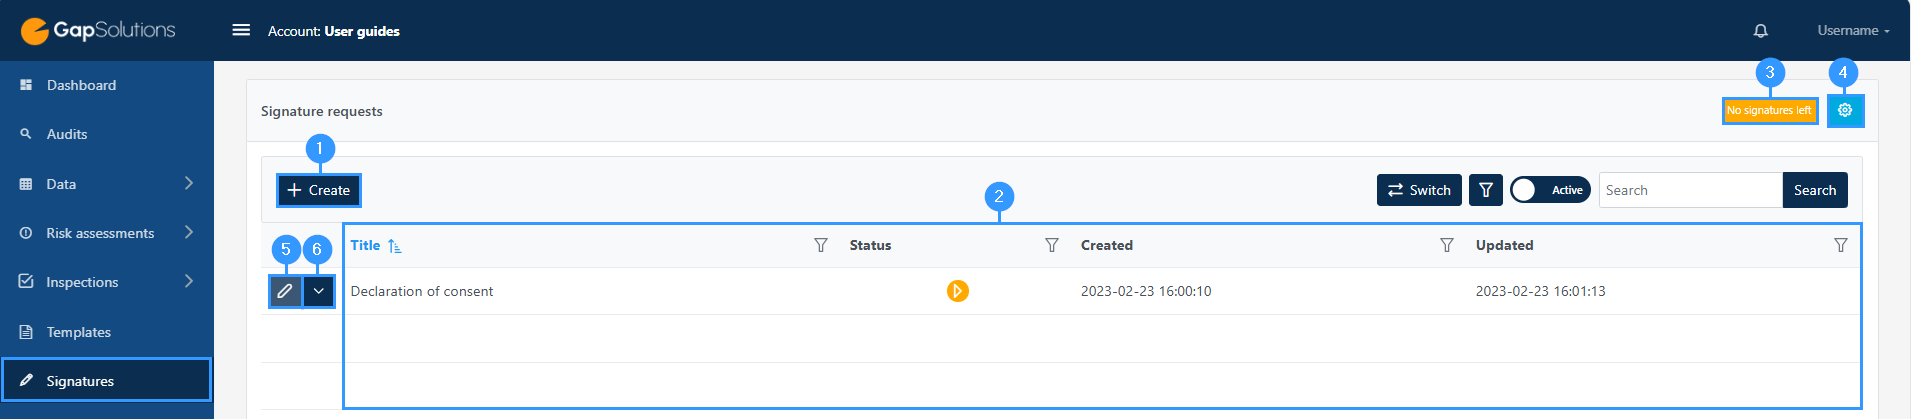
1. Create
-Here you can create a new signature order, where the relevant documents should be uploaded and you create the people whose signature are desired.
2. Overview
-Here you can see a variety of information about your signature orders. The title you can see is the one specified when the signature order was created. The status indicates whether the signature has been signed, in progress or rejected. If the status is rejected, you can click on the edit-icon, (5) in the image above, and see who has rejected the signature and what reason they have given for this.
3. No signatures left
-This field is green when you have signatures you can send out. The field informs you how many signatures you have left to send out and when these expire. Please note that if this field is orange and it says “no signatures left”, you must contact GapSolutions to purchase access to send out signature requests.
4. Settings
-This is a settings module where you have the option to make some specific settings for the signature requests you send out.
5. Edit
-Here you can edit existing signature orders. It will open the same form as when you create a new signature order, but will start on the part of the form that indicates status. It’s only possible to edit a signature order if it haven’t been send out yet and is saved as a draft.
6. Delete/archive
-Here you can delete or archive a signature order.
Creating a signature order
When you click on create (1) or the edit icon (5) in the image above, you will open a form that looks like this:
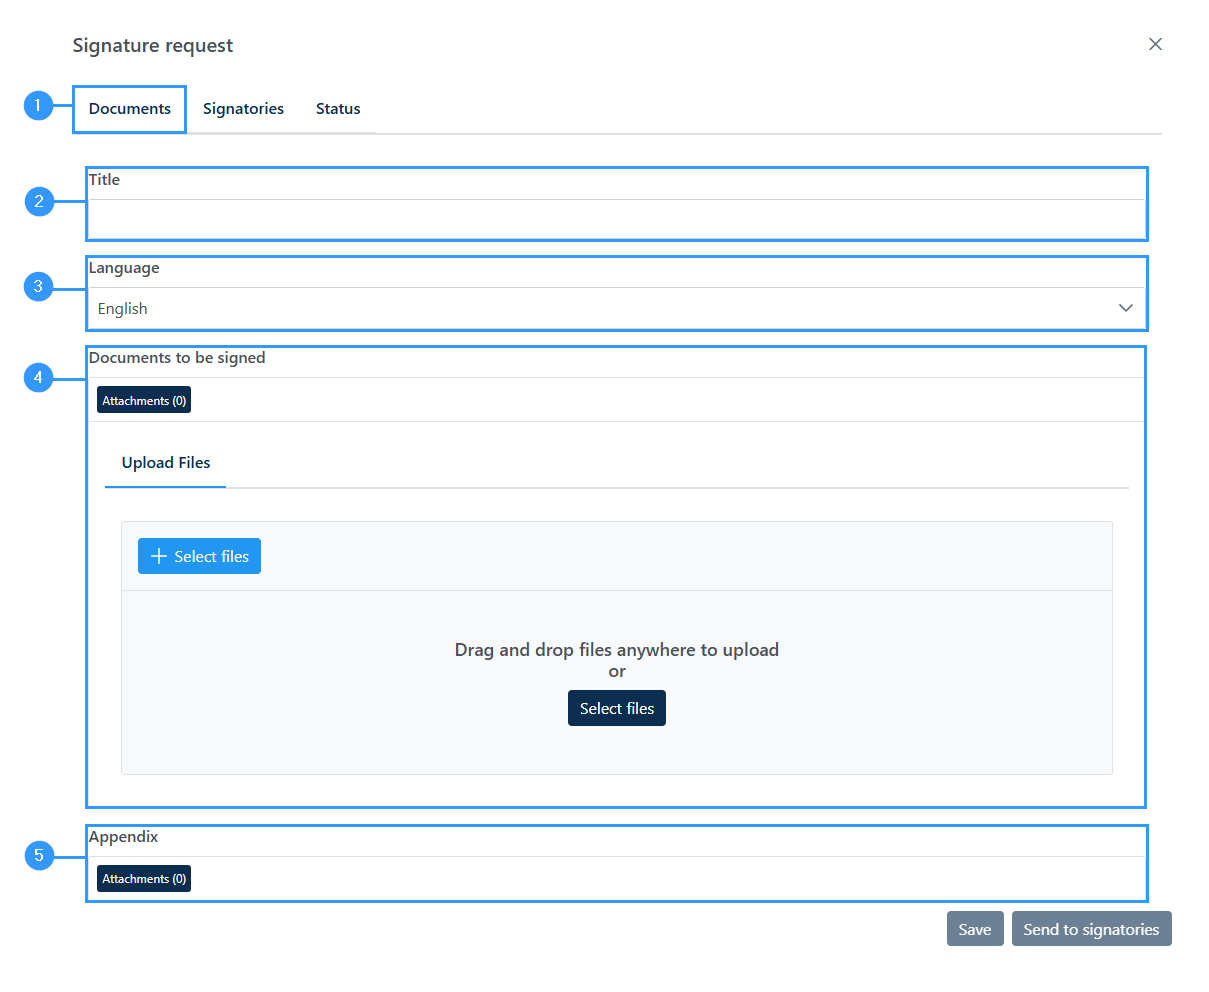
1. Documents
-This section of the form concerns the documents you want signed and other documents.
2. Title
-Here, you must enter a title for the signature order that you want to send.
3. Language
-The language you need to set here is the language in which the recipient will view the signature request.
4. Documents to be signed
-Here you need to attach the document(s) you want to have signed. It is only possible to upload documents in PDF format, so you should be aware of converting your document to PDF to upload it.
5. Appendix
-In case you have some documents that need to be added to the signature order without them being documents you want signed, add them here.
Here you should also pay attention to the fact that the document must be converted to PDF.
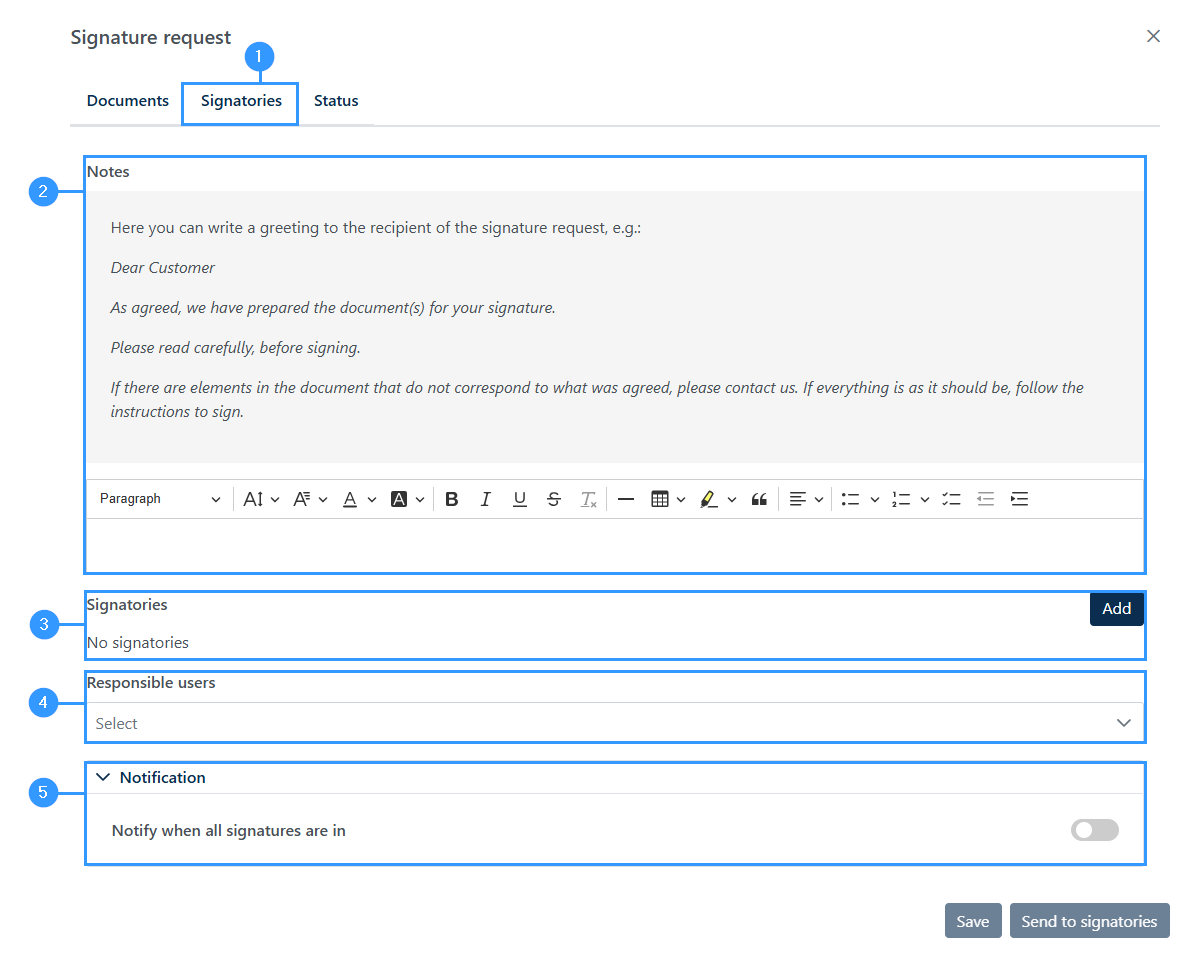
1. Signatories
-Here you need to click to get to the section that deals with signatories.
2. Notes
-This field is used if you want to send the signature order directly through the portal. What you type in the field here will show in the email with a link to the signature order itself. In the gray box above the field, a standard wording has been designed that you can use in case there are no other things that need to be elaborated in the sending of the signature order. It is not mandatory to fill in this document, but we advise you to do it if you want to send the signature order through the portal. If you do not want to send out the signature order through the portal, but simply use the link you get to the signature order, it is unnecessary to fill in this field.
3. Signatories
-If you want to send the signature order through the portal, you must provide both name and email. If you just want to get a link to the signature order that you can send out yourself, just enter the name of the signatory.
4. Responsible users
-Here you can see the signatories that you have added to that signature order. When a signatory is added, you will be able to delete or edit with two icons to the right of the name.
5. Notification
-When toggling this on you will get notified when all signatures are in
Here, you can see an example of what a signature order might look like after you have filled in the “Notes” (2) and send the signature order through the portal:

The last section of the portal deals with the status of the signature order.
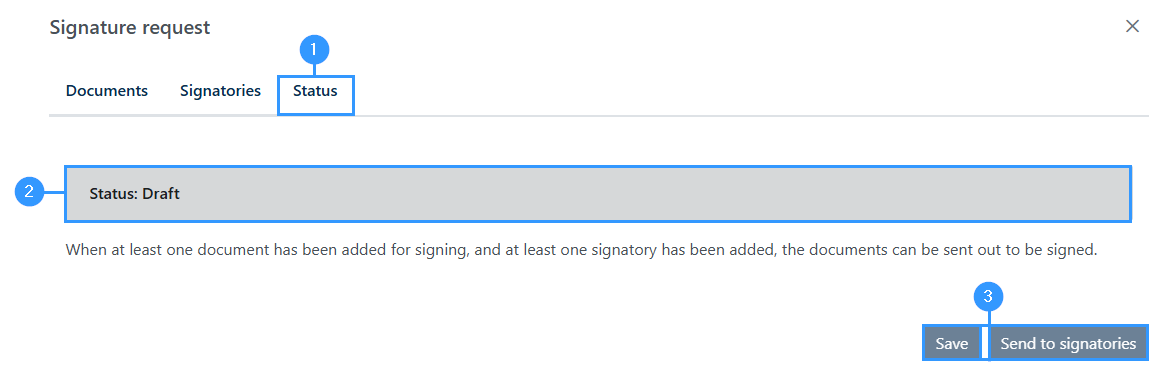
1. Status
-To get to the status section, you must click on this fan.
2. Status: Draft
-This is where you can see the status of the signature order you have created. As long as you have not issued the signature order, the status will be as a draft and will be gray. Once a signature order is issued, it changes to yellow and is ongoing.
If a signature is signed, it will appear in the status and the field will turn green.
If a signature is rejected, the field will be red and there will be a field that will show the reason given by the signatory for rejecting the order.
3. Save / Send to signatories
-Once you have completed the form, you can save the signature order and send it out to signatories. If you choose to send it out to signatories, the signature request editing option will be locked. When you use the portal to send directly to the signer, this will result in the portal sending an email with the signature order to the desired person.
If you do not use the portal’s ability to send out the signature order directly, it will look like this:

To send out the signature order, click on the blue “copy link” button that will copy the link to your clipboard. The link opens directly into the signature order, and it is this link that you need to send to the signatories.
Options for sending out signatures
In the top right corner of the Signatures module, you can find a small, blue settings-icon that looks like this:

When clicking here, you can access the settings for the page that opens for a signer when signing a document. The form that opens looks like this:
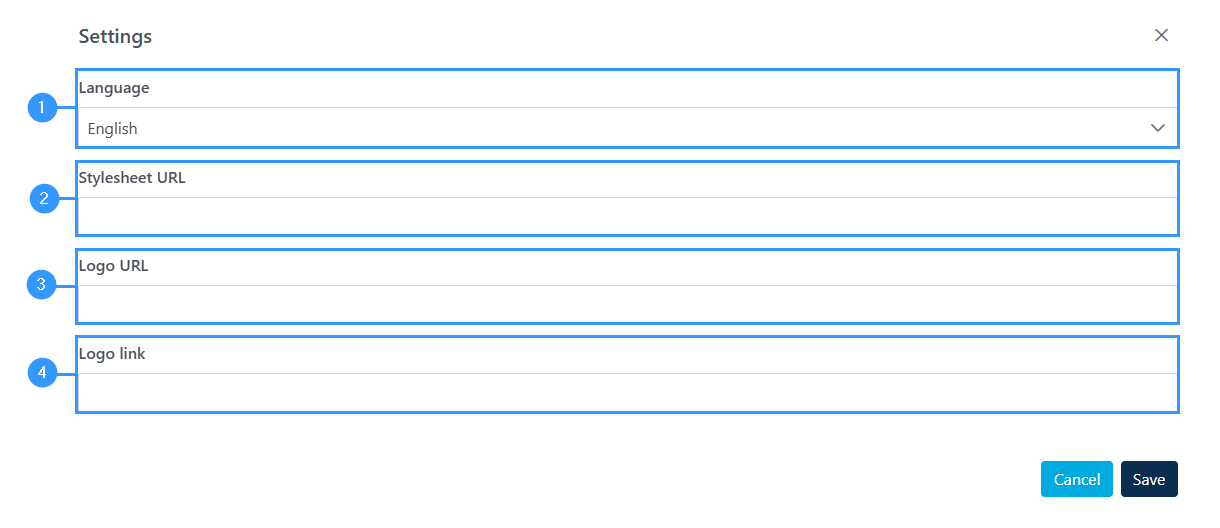
1. Language
-Here you can set a default setting for the language in which the signature order form should be set as a starting point. It is always possible to edit the language setting in the individual signature orders.
2. Stylesheet-URL
-This option relates to what colors the different buttons in the signature order should be.
3. Logo URL
-Here it is possible to insert a logo, which will appear on the signature order.
4. Logo link
-Here you can insert a link that you want to forward the signer to by clicking on the logo you have inserted above.
The following example illustrates what a signature request will look like when signatories open the link. In this example, there are two documents for signature. If there is only one document attached, the page will display the document and its contents when the link is opened.
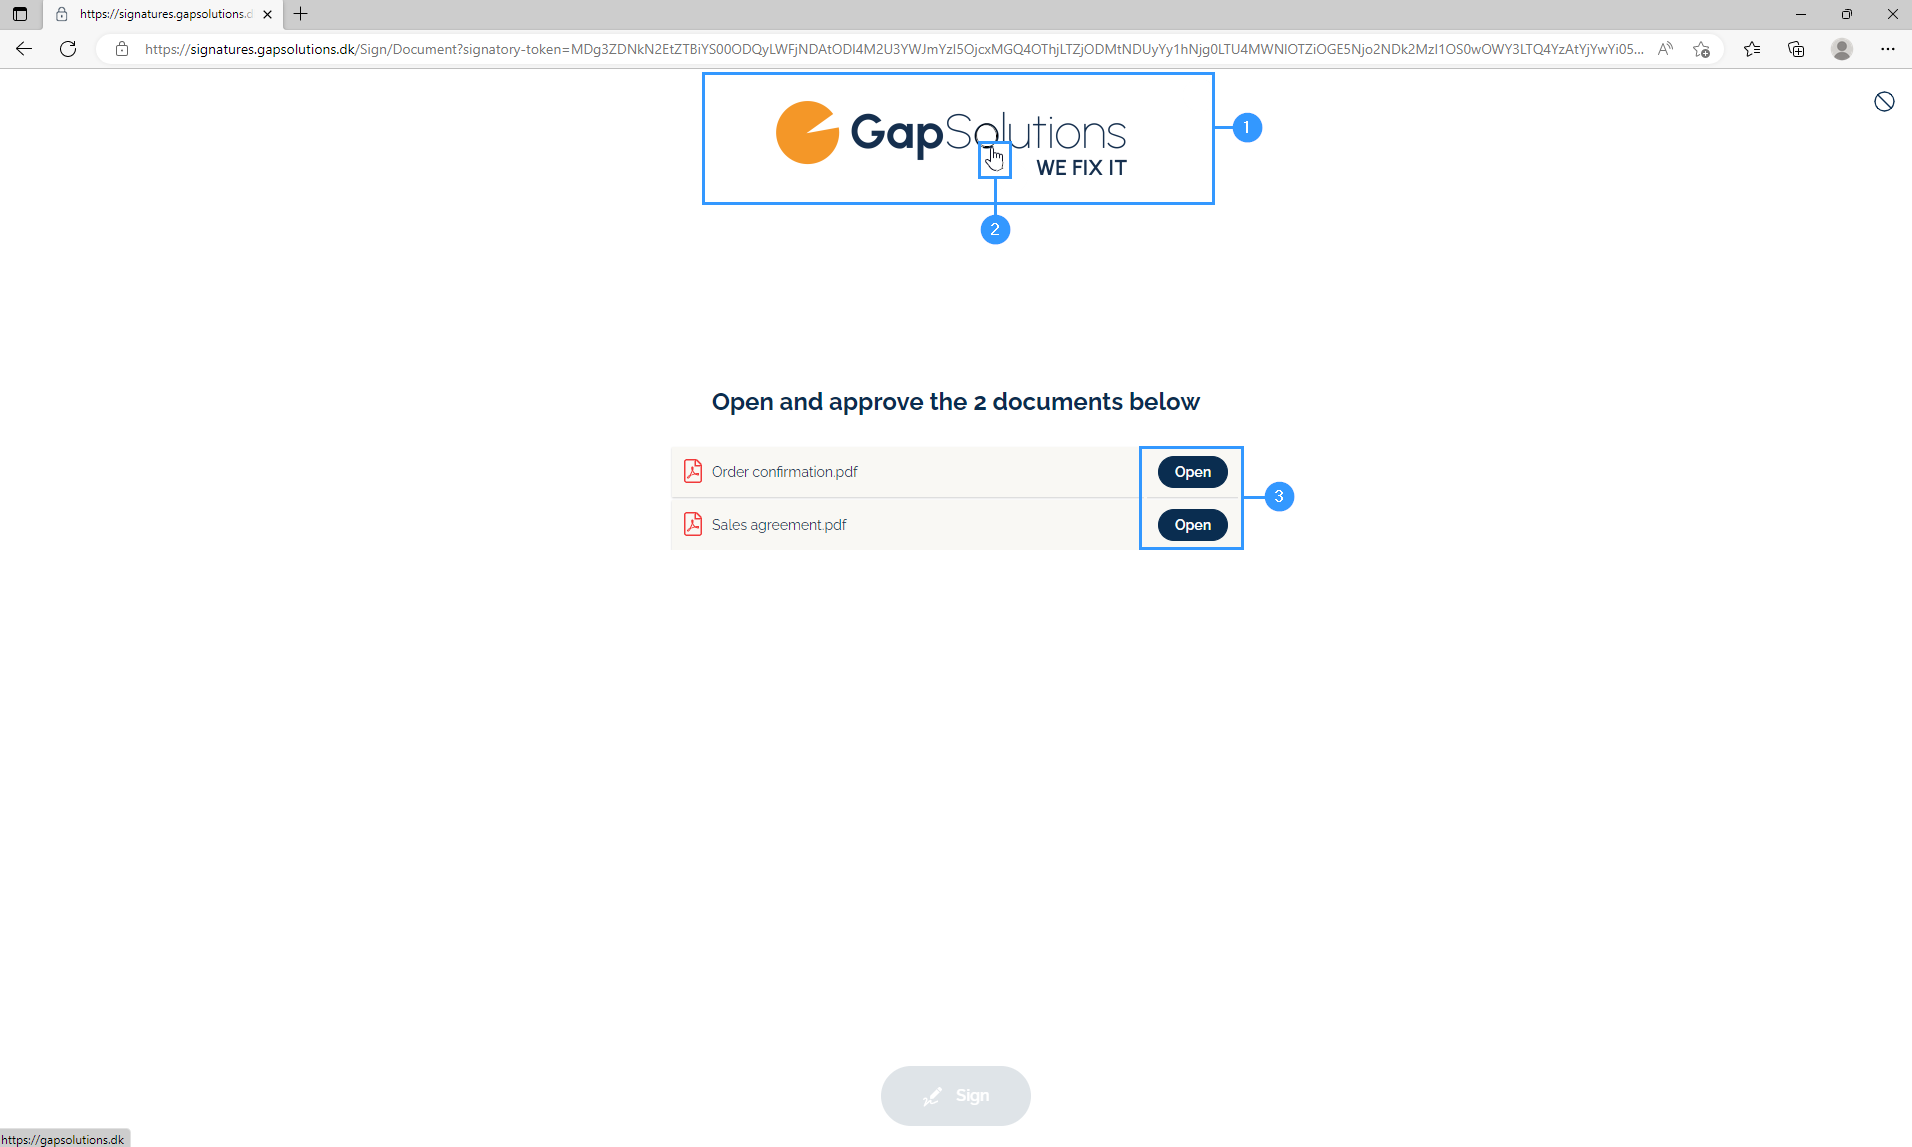
1. Your chosen logo
-Here, the signer will be able to see the logo you put in under Logo URL.
2. Hyperlink to webpage
-When a signer clicks on the logo here, the customer will be taken to the link you have chosen in the logo link.
3. Open
Click here to open and sign the documents
Adresse
GapSolutions A/S
Uraniavej 6
DK-8700 Horsens
CVR
CVR-nr. 38582356
Telefon
Salg & administration
(+45) 8844 0808
Helpline & konsulenter
(+45) 2199 0808
E-mail
Kontakt@gapsolutions.dk
Support@gapsolutions.dk
Vi bruger udelukkende tekniske cookies på vores hjemmeside. For yderligere information se vores Cookiepolitik.
Vi er ISO 27001-certificeret og ISAE 3000-auditeret.