
Creating new types of risk assessments
In the portal, risk assessments have been automatically created, but it is also possible to make new types of risk assessments and customize what you want to assess risks on.
In principle, the tool can be used as desired. For example, you can create a classification assessment, an information security risk assessment for the company and a GDPR risk assessment for the data subject on the same item and be able to see it separately.
Keep in mind that the new types of risk assessments that you create do not affect the dashboard in the portal. This means that creating new types of risk assessments will not close any “gaps” in the dashboard.
Below is a step-by-step guide that elaborates on where and how to create new types of risk assessments:
Where do I create a new type?
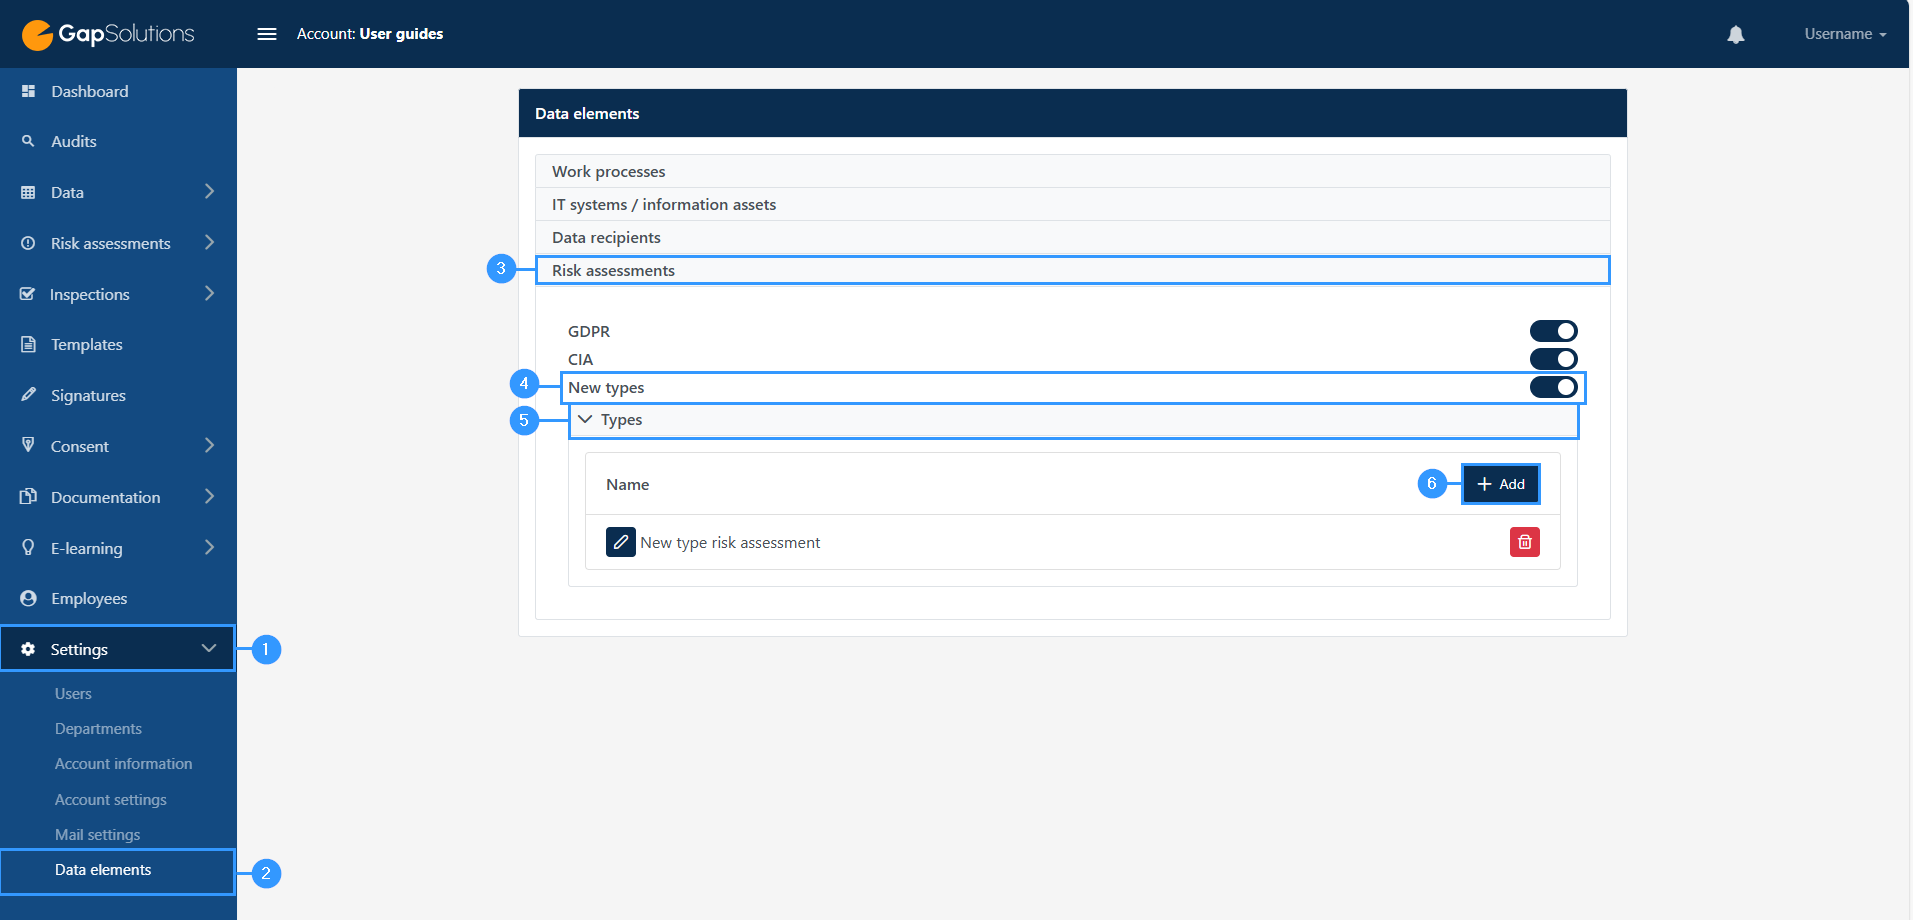
1. Settings
-New types are created through the settings menu, so you should start by clicking on “settings” in the menu bar on the left.
2. Data elements
-When you click on “settings” the menu item will unfold with subitems. In the submenu, click on “Data Elements”.
3. Risk assessments
-“Data Elements” are divided into a few different categories. Here you need to click on the category “Risk assessments”, which will open some additional fields.
4. New types
-To create new types of risk assessments, this must be turned on in settings. To do this, click on the icon. When it is dark blue as in the picture, it indicates that it has been clicked on. When you click on the icon, this also causes the “Types” bar to appear.
5. Types
-To be able to create new types and see types that have already been created, click on this bar.
6. +Add
-when you want to create a new type of risk assessment, click here and you will open a window. It will be discussed in more detail below how to create the new type of risk assessment:
How do I create a new type?
When you click on the “+Add“-button as shown (6) in the image above, you will open a window with a form that you need to fill out to create a new type of risk assessment. The window looks like this:
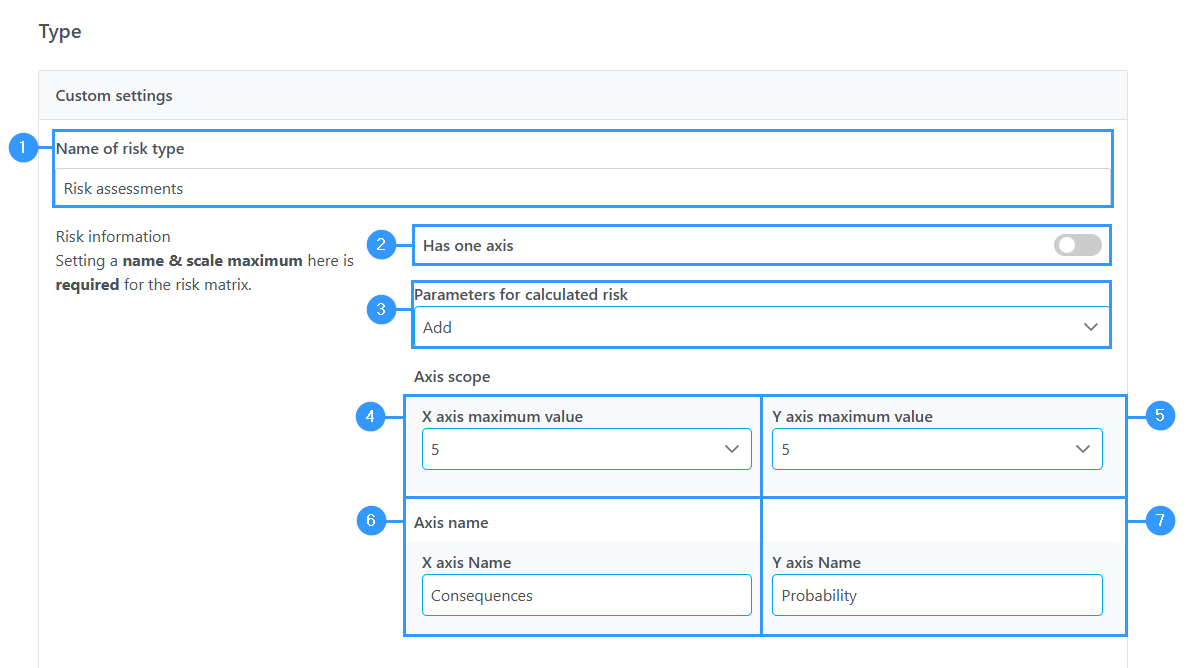
1. Name of risk type
-In this field, you must specify which name you want the type you create to have.
2. Has one axis
-This field determines whether you are creating a risk assessment with one or two axes.
By default, one axis is turned off, which means that you create a two-axis assessment by default. If you only want one axis, click on the icon to the right. The icon turns dark blue when turned on.
3. Parameters for calculated risk
In this field you can choose how the risk should be calculated. Here you can choose between adding and multiplying.
4. X axis maximum value
-In this field, specify how far the X axis max should go. The highest you can choose is 10.
5. Y axis maximum value
-In addition, you must choose a maximum of scale for the Y axis. The highest you can choose is 10.
6. X axis name
-This part is for specifying the name for the X axis. The name reflects what you are assessing based on the X axis.
7. Y axis name
-As for the X axis, this part is for specifying the name for the Y axis and the name reflects what you are assessing based on the Yaxis.
Below, it will be discussed in more detail how to set the different levels that can be assessed by. Please note that the number of levels is determined by the X and Y axis max.
Likewise, you should be aware that if you have selected only one axis, it will only appear for the X axis levels. In the following example we will be working with both an X and a Y axis:
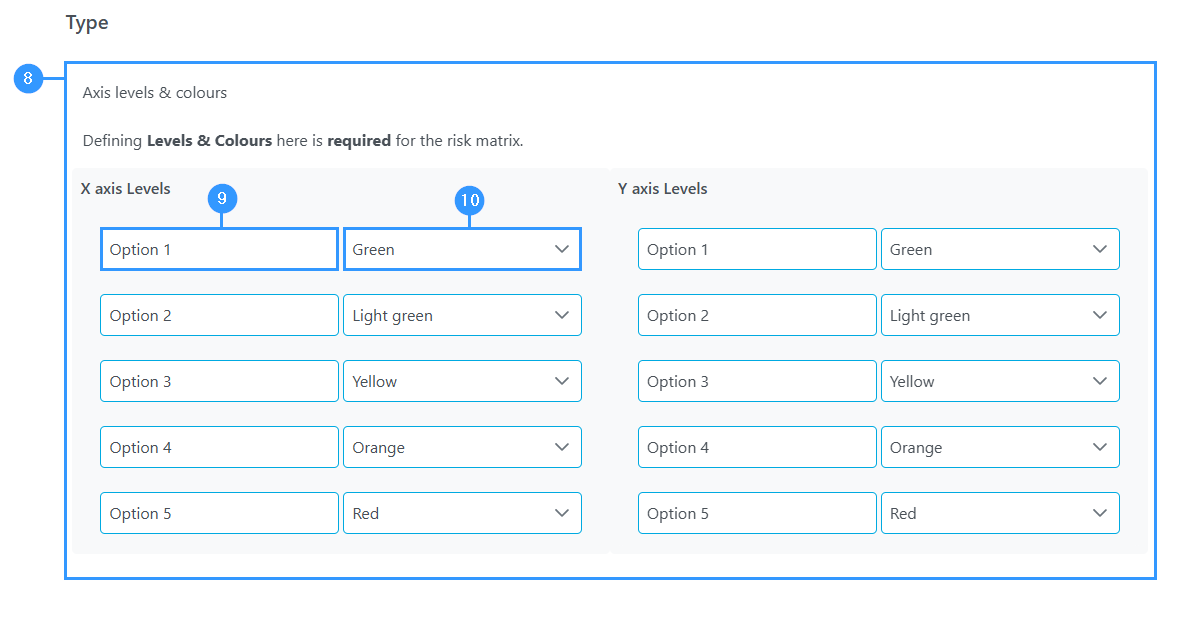
8. Axis level and colors
-Here you edit the different levels and choose which color each level should be indicated with.
9. Name
-All fields (option 1 – option 5) in both columns can be edited. Here you need to specify a “name” for each level. You may want to rate on low to high, after which you can call them “very low”, “low”, “medium”, “high”, and “very high”. It is up to you how you want to divide the levels and what you want to call them.
10. Scale
-Here you can choose which color you want the choice to reflect in. The colors you can choose from when there are 5 axes are the colors shown in the following example below.

11. Define limits for acceptable risk
-In this field, you set the total calculation between the x and y axis, if you have chosen to have two axes, as in the example. If you choose to have only one axis, you won’t have to set the calculation in this field.
12. Color of risk assessment
-Next to each overall risk, you can see here which color this will reflect in the risk assessment.
13. Min | Max
-Here it is possible to edit what the total risk must be at the different levels, to be included under one of the 5 labels.
14. Label
-If you want to, you can edit the name of the level by this field. You can click on the field and write a label for each level of overall risk, but you can also simply use the suggestion that the system provides.
How do I apply my new type of risk assessment
For example, when you create a new work process under Data, you will be able to apply the new type of risk assessment to this end. This is done like this:
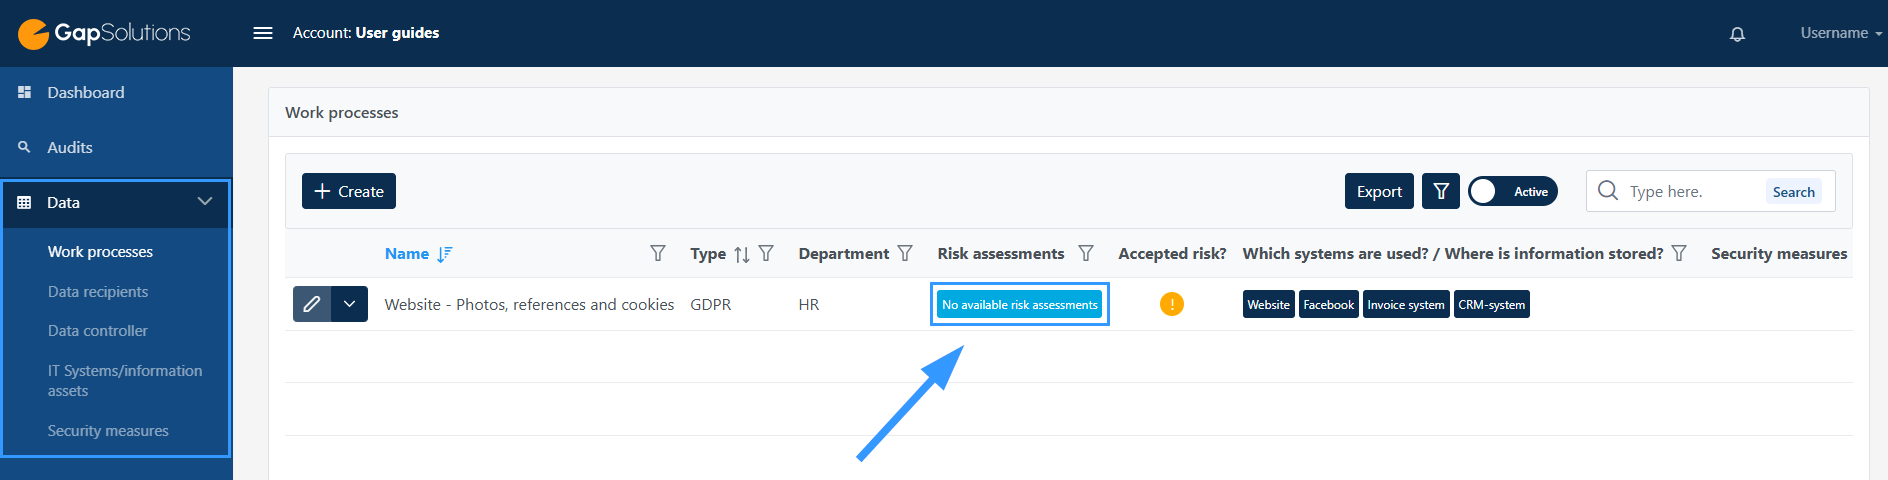
Click on the botton “No available risk assessments” to create a risk assessment for the specific work process.
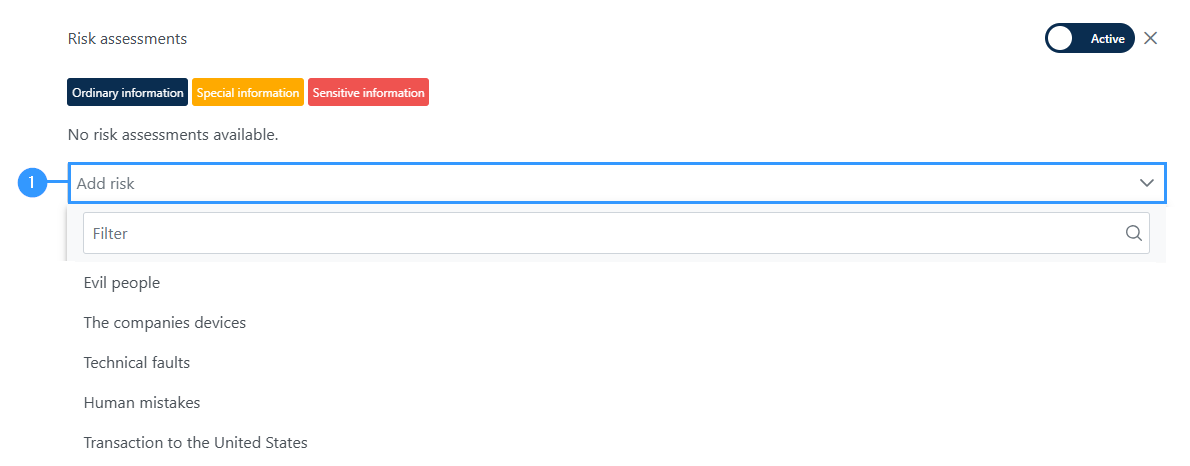
1. Add risk
Click on “add risk” and choose from the risks created in your portal.
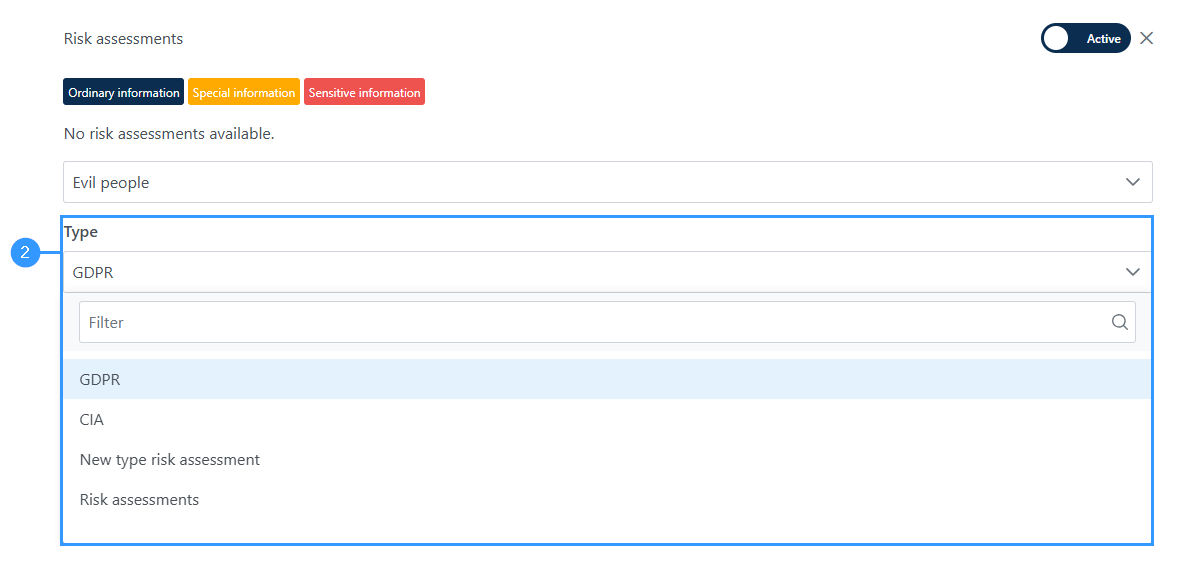
2. Type of risk
Once you have selected a risk, a form will open and the “Type” field will appear if you have multiple risk assessments under Data elements in your settings. Here you need to click on the field to see the overview of the different risk assessments you can choose from, as shown in the picture below:
Adresse
GapSolutions A/S
Uraniavej 6
DK-8700 Horsens
CVR
CVR-nr. 38582356
Telefon
Salg & administration
(+45) 8844 0808
Helpline & konsulenter
(+45) 2199 0808
E-mail
Kontakt@gapsolutions.dk
Support@gapsolutions.dk
Vi bruger udelukkende tekniske cookies på vores hjemmeside. For yderligere information se vores Cookiepolitik.
Vi er ISO 27001-certificeret og ISAE 3000-auditeret.